Shade Guides in Dentistry⁚ An Overview
Dental shade guides are essential tools for accurate color matching in restorative dentistry. They provide a standardized system for identifying and communicating tooth shades‚ ensuring consistent and aesthetically pleasing results for patients. These guides are crucial for both dentists and technicians in achieving natural-looking restorations.
The Importance of Accurate Shade Matching
Precise shade matching is paramount in achieving aesthetically pleasing and natural-looking dental restorations. Inaccurate shade selection can lead to noticeable discrepancies between the restoration and the natural teeth‚ impacting the patient’s smile and self-confidence. A mismatch can result in restorations that appear artificial or out of place‚ detracting from the overall appearance. Accurate shade selection ensures a seamless blend‚ enhancing the patient’s smile’s natural beauty and improving their overall satisfaction with the treatment. The process involves considering various factors‚ including lighting conditions‚ individual tooth variations‚ and the expertise of the dentist and dental technician. Modern technology‚ such as digital shade measurement devices‚ further enhances precision‚ minimizing the potential for errors and optimizing the final aesthetic outcome. The goal is to create restorations that are not only functional but also enhance the patient’s smile’s natural beauty‚ boosting their confidence and self-esteem.
Types of Shade Guides⁚ A Comparison
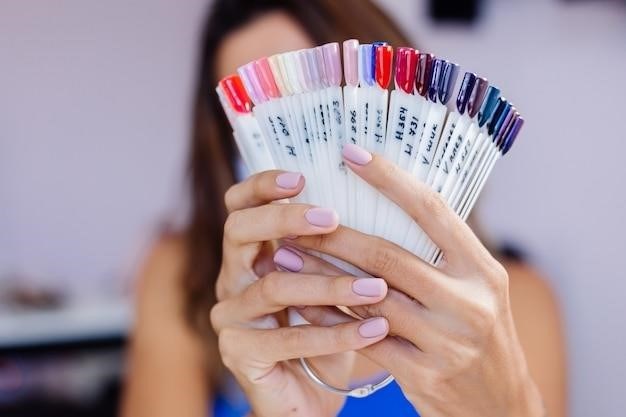
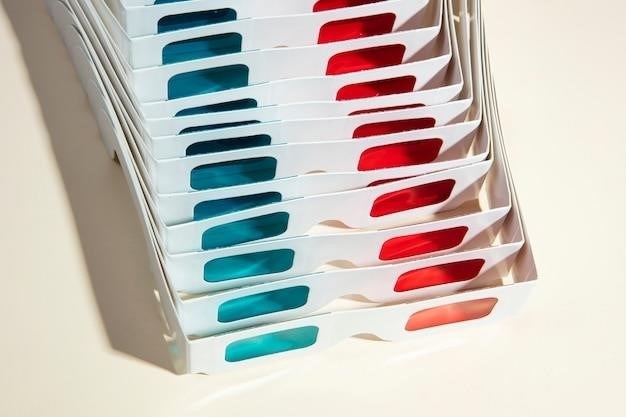
Several types of shade guides cater to the diverse needs of dental professionals. Traditional visual shade guides‚ like the VITA Classical A1-D4‚ offer a range of color tabs for comparison. These guides are widely used due to their simplicity and affordability‚ yet they can be subjective to lighting conditions and individual perception. Digital shade measurement devices‚ on the other hand‚ offer objective and more precise shade determination. They employ spectrophotometry to quantify color‚ minimizing the influence of human interpretation. These devices often integrate with CAD/CAM systems for streamlined workflow. Furthermore‚ innovative shade guides incorporate features like improved color organization and enhanced durability‚ facilitating efficient shade selection. The choice between visual and digital systems depends on factors like budget‚ practice size‚ and the dentist’s preference. Each guide type plays a vital role in ensuring precise shade matching‚ ultimately contributing to the success of dental restorations.
The Munsell Color System and Shade Guides
Many dental shade guides are based on the Munsell Color System‚ a three-dimensional color model that organizes colors according to hue‚ value (lightness)‚ and chroma (saturation). This system provides a standardized framework for describing and comparing colors‚ crucial for consistent shade selection in dentistry. The hue represents the color itself (e.g.‚ red‚ yellow‚ blue)‚ while value indicates how light or dark the color appears. Chroma describes the color’s intensity or saturation. By using the Munsell system‚ shade guides allow dentists to precisely identify and communicate tooth shades‚ ensuring accurate reproduction in restorations. The three-dimensional nature of the system accounts for the complexity of natural tooth color‚ which varies in both lightness and saturation. This systematic approach minimizes discrepancies and ensures a more predictable outcome‚ leading to aesthetically superior restorations that blend seamlessly with the patient’s natural dentition. The Munsell system is fundamental for accurate color communication between dentist and laboratory technician.
Factors Affecting Shade Selection
Accurate shade selection in dentistry is influenced by various factors‚ including lighting conditions‚ individual tooth variations‚ and the expertise of both the dentist and dental technician. These elements significantly impact the final result.
Lighting Conditions and Their Impact
The accuracy of shade selection is critically dependent on the lighting conditions under which the procedure is performed. Natural light‚ often considered ideal‚ can vary significantly throughout the day due to changes in sunlight intensity and cloud cover. Artificial lighting‚ while providing consistency‚ can introduce its own set of challenges. Different types of artificial lights‚ such as incandescent‚ fluorescent‚ and LED‚ emit light with varying spectral compositions‚ potentially leading to discrepancies in shade perception.
To mitigate these issues‚ dentists often utilize specialized lighting systems designed to minimize distortions and ensure consistent color rendering. These systems may incorporate daylight-simulating bulbs or filters to create a controlled and neutral lighting environment. The use of a neutral gray background is also recommended to further reduce the impact of reflected light on shade perception. Furthermore‚ the dentist should be mindful of the patient’s position relative to the light source to prevent shadows from interfering with accurate shade assessment. Careful attention to lighting is paramount for ensuring the selection of the most appropriate shade.
Individual Variations in Tooth Shade
Human teeth exhibit a remarkable degree of natural color variation‚ influenced by a multitude of factors. Genetic predispositions play a significant role‚ determining the inherent base shade of an individual’s teeth. Age also impacts tooth color‚ with teeth tending to darken slightly over time due to various factors such as staining and wear. Lifestyle choices‚ such as diet and smoking habits‚ can contribute to discoloration and alter the overall shade. Exposure to certain medications can also influence tooth color. Furthermore‚ the intrinsic shade of the dentin and enamel layers varies between individuals‚ further contributing to the overall complexity of tooth shade.
These inherent variations necessitate a careful and individualized approach to shade selection. The dentist must consider not only the overall shade of the tooth but also the subtle variations in hue‚ chroma‚ and value across different surfaces. A comprehensive assessment‚ encompassing multiple views and lighting conditions‚ is essential to achieve a harmonious and natural-looking restoration. Failure to account for these individual variations can lead to restorations that appear out of place or unnatural.
The Role of the Dentist and Technician
The dentist plays a pivotal role in shade selection‚ beginning with a thorough clinical examination and patient consultation. Accurate shade taking requires careful consideration of various factors‚ including lighting conditions‚ patient age‚ and overall oral health. The dentist must effectively communicate with the patient‚ managing their expectations regarding the final outcome. They are responsible for selecting the appropriate shade guide and employing proper techniques to minimize errors. Beyond the initial shade selection‚ the dentist oversees the entire restorative process‚ ensuring the final restoration harmonizes with the patient’s natural dentition.
The dental technician‚ in collaboration with the dentist‚ translates the chosen shade into the final restoration. They possess expertise in manipulating dental materials to achieve the desired color and translucency. A skilled technician can precisely match the shade selected by the dentist‚ paying close attention to detail and utilizing their technical skills to create a seamless and aesthetically pleasing result. Effective communication between the dentist and technician is crucial for successful shade matching and overall restoration quality.
Advanced Techniques in Shade Selection
Digital shade measurement devices offer objective and precise shade determination‚ minimizing subjective bias. Innovative shade guide designs improve usability and accuracy‚ while standardized protocols ensure consistent results across different practitioners and settings.
Digital Shade Measurement Devices
Digital shade measurement devices represent a significant advancement in shade selection technology‚ offering several key advantages over traditional visual methods. These devices utilize spectrophotometry to objectively quantify the color of teeth‚ eliminating the subjectivity inherent in human visual assessment. Spectrophotometers measure the spectral reflectance of light from the tooth surface‚ providing precise numerical data that can be used to select the most appropriate shade from a shade guide or to fabricate a custom shade restoration. The use of digital technology mitigates the influence of ambient lighting conditions and individual variations in color perception‚ leading to more consistent and accurate shade matching. Furthermore‚ the data obtained from these devices can be stored electronically‚ creating a permanent record of the shade selection for future reference. This digital record can be invaluable in managing patient cases‚ particularly in situations where multiple restorative procedures are required over time. The incorporation of digital shade measurement devices into dental practices represents a significant step toward optimizing the accuracy and efficiency of shade selection.
Innovative Shade Guide Designs
Recent advancements have led to innovative shade guide designs aimed at improving accuracy and ease of use. Traditional shade guides‚ often comprised of individual shade tabs‚ have been refined with features like improved color stability and more realistic tooth simulations. Some manufacturers incorporate advanced materials to better mimic the optical properties of natural teeth‚ including translucency and fluorescence. The development of 3D-printed shade guides allows for customized options‚ tailoring the guide to a patient’s specific needs. These guides can be created with digital scans of the patient’s teeth‚ ensuring a precise match. Furthermore‚ digital shade guides‚ integrated with software‚ offer features such as shade comparison tools and digital shade recording. These tools help dentists and technicians to objectively compare different shades and track patient shade changes over time. The evolution of shade guide design continues to focus on improving the accuracy and efficiency of shade matching‚ leading to more predictable and aesthetically pleasing results in restorative dentistry.
Protocols for Consistent Shade Selection
Establishing standardized protocols is crucial for consistent shade selection in dental procedures. A well-defined protocol minimizes variability and enhances the reliability of shade matching. This typically involves controlling the environment‚ including consistent and standardized lighting conditions‚ to avoid variations caused by ambient light. Using a neutral gray background also helps to minimize reflections that can affect shade perception. The protocol should specify the distance at which the shade guide is held from the tooth‚ ensuring consistent viewing conditions. It’s important to consider the time of day‚ as natural light can change throughout the day. The dentist’s experience and ability to recognize and account for individual variations in tooth shade also plays a significant role. Detailed documentation of the shade selection process‚ including the specific shade chosen and any relevant observations‚ is crucial for ensuring accuracy and communication between dentists and dental technicians. These protocols‚ when meticulously followed‚ contribute to improved precision and repeatability in shade selection‚ resulting in more natural-looking restorations.
Maintaining Shade Guide Accuracy
Regular calibration and proper storage are vital for maintaining the accuracy of dental shade guides. Consistent handling and protection from damage ensure long-term reliability and precise shade matching.
Calibration and Maintenance Procedures
Maintaining the accuracy of dental shade guides is paramount for consistent and reliable shade selection. Regular calibration against a known standard is essential to detect and correct any color drift or degradation. This involves comparing the shade guide’s colors to a certified reference standard‚ using a spectrophotometer or other calibrated instrument. Any significant deviations should prompt replacement or adjustment of the shade guide. Cleaning the shade guide tabs gently with a soft‚ damp cloth is important to remove surface contamination that might affect color perception. Avoid using harsh chemicals or abrasive materials that could damage the surface of the shade tabs. Proper cleaning helps maintain the integrity of the colors and prolongs the lifespan of the shade guide. Storing the shade guide in a designated‚ protective case away from direct sunlight‚ extreme temperatures‚ and moisture is crucial. These preventative measures help to maintain the accuracy and longevity of the shade guide‚ ensuring reliable shade matching in dental procedures.
Storage and Handling Recommendations
To ensure the longevity and accuracy of your dental shade guide‚ proper storage and handling are crucial. Keep the shade guide in its protective case when not in use to shield it from dust‚ scratches‚ and accidental damage. The case should ideally be stored in a cool‚ dry place‚ away from direct sunlight and extreme temperatures. Fluctuations in temperature and humidity can affect the color stability of the shade tabs over time. Avoid storing the shade guide near strong chemical fumes or solvents‚ which can potentially alter the color of the tabs. When handling the shade guide‚ use clean‚ dry hands to prevent contamination of the shade tabs. Handle the tabs gently‚ as excessive pressure or rough handling could cause damage. If any staining or discoloration occurs on the shade tabs‚ carefully clean them using a soft‚ damp cloth and mild soap. Regular inspection of the shade guide for any signs of wear and tear is recommended. If any damage is detected‚ consider replacing the shade guide to ensure accurate shade matching. By following these guidelines‚ you can effectively prolong the usability and maintain the accuracy of your shade guide for consistent‚ high-quality dental restorations.